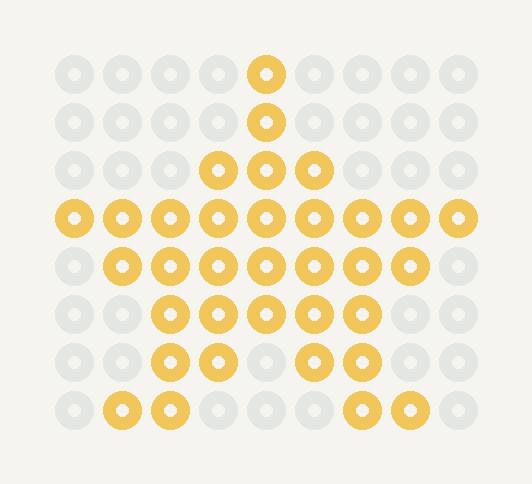
A compact star for practicing a balanced outline. Follow the original placement grid below, then download the printable guide.
BEGINNER · SQUARE GRID
Your project at a glance
9 columns × 8 rows · 34 beads · 1 color
A square pegboard matching your bead size, your chosen beads, suitable fusing paper and an adult-operated iron are required.
Colors and exact bead counts
These are suggested mini bead colors from Fusedots. Choose compatible beads and boards; screen colors are approximate. Listed products are sold in packs, not the exact quantities below.
| Grid key | Color suggestion | Beads needed | Matching shop color |
|---|---|---|---|
| Y | Warm yellow | 34 | Mini Fuse Beads – E03 Classic Sunshine Yellow – 1,000 Pieces |
Build the pattern
- Place the top point and middle row.
- Build both sides as mirror images.
- Keep the two lower points attached to the body.
- Each colored square is one bead; empty squares stay empty. Compare your layout with the PDF before fusing.
- An adult should fuse and cool the design following the bead manufacturer’s instructions. Keep loose beads away from young children.
The printed grid is for reading, not a life-size placement template. This simple motif can be used for personal craft projects.
Zhodiao and Fusedots are operated by the same owner. You can use your own compatible supplies; no purchase is required to download this pattern.